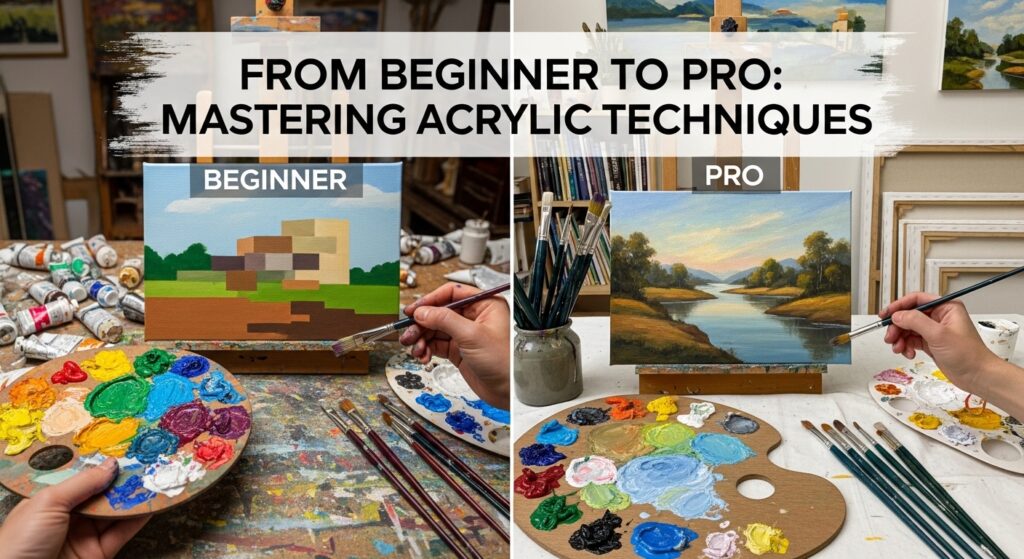
Are you ready to unleash your creativity and take your artwork to the next level? If you’ve ever been intrigued by the vibrant world of Akrylika, you’re in for a treat. This versatile medium combines the best aspects of acrylic paint with unique techniques that can elevate any piece. Whether you’re just starting out or looking to refine your skills, mastering Akrylika can transform your artistic expression.
Imagine creating stunning textures, blending colors seamlessly, and incorporating mixed media into your paintings—all while enjoying the process! The possibilities are endless when you dive into this exciting realm. So grab your brushes and let’s explore how you can go from a beginner to a pro in no time!
Setting Up Your Workspace for Akrylika Painting
Creating an ideal workspace for Akrylika painting is essential for unleashing your creativity. Start by choosing a well-lit area, preferably near natural light. This will help you see the true colors of your paints and enhance your overall experience.
Invest in a sturdy easel that can hold your canvas securely. A comfortable chair at the right height will also make lengthy sessions more enjoyable.
Organize your materials within arm’s reach. Use containers or caddies to keep brushes, palettes, and paints tidy. Consider using a palette with compartments to easily mix colors without making a mess.
Protect surfaces with old newspapers or plastic sheets to catch any accidental spills. It’s all about creating an inviting environment where inspiration can flow freely while keeping everything manageable and easy to access.
Understanding the Basics of Color Mixing in Akrylika
Color mixing is a vital skill for any Akrylika artist. Understanding how colors interact can elevate your artwork to new heights.
Start with the primary colors: red, blue, and yellow. These are the building blocks of all other hues. When mixed together, they create secondary colors—green, orange, and purple.
Experimenting with ratios is key. A little more blue than yellow will yield a different shade of green than an equal mix would.
Don’t forget about neutrals! Adding white lightens your color, while black deepens it. This knowledge can help you achieve stunning shadows and highlights in your work.
Keep a palette handy to test mixtures before applying them to canvas. Document successful combinations for future reference; every artist has their unique preferences that develop over time.
Trust your instincts and let experimentation guide you in this colorful journey!
Different Techniques for Creating Texture and Depth in Your Artwork
Creating texture and depth in your akrylika artwork can elevate it from simple to stunning. One effective method is using a palette knife. This tool allows for bold strokes, layering paint thickly to add dimension.
Another technique involves sponging. By dabbing a sponge onto the canvas, you can create unique patterns and organic textures that bring your piece to life. Experiment with different pressures for varied effects.
Dry brushing is another favorite among artists. With this approach, you lightly drag a dry brush across dried paint layers, revealing underlying colors while adding subtle texture.
For those who love mixed media, consider incorporating sand or gel mediums into your akrylika paints. These materials enhance both tactile quality and visual interest, giving your work an entirely new feel.
Don’t shy away from experimenting with these techniques; each offers endless possibilities for expressing creativity through texture in your art!
Tips for Achieving Smooth Blends and Gradients with Akrylika Paints
Achieving smooth blends and gradients with akrylika paints can elevate your artwork to new heights. Start by using a soft brush or sponge. These tools help you create seamless transitions between colors.
Layering is key. Begin with a base color, then gradually introduce lighter or darker shades. Apply them while the previous layer is still wet for optimal blending.
Don’t rush the process. Take your time as you work each area of your canvas, allowing colors to meld naturally but control their edges.
Experiment with water or a medium designed for akrylika to thin out your paint if needed. This technique enhances flow without diluting pigment intensity too much.
Practice feathering techniques by lightly dragging the edge of one color into another while both are still wet. It’s an effective method for creating depth in landscapes or portraits.
Incorporating Mixed Media into Your Akrylika Pieces
Mixed media can elevate your akrylika artwork to new heights. Combining various materials adds depth and intrigue. Consider integrating collage elements, such as paper or fabric. These textures create visual interest that pure paint alone may lack.
Experiment with different surfaces too. Canvas is popular, but wood panels or even cardboard can offer unique results. Each surface interacts differently with akrylika paints, influencing the final piece.
Don’t shy away from incorporating other types of paint or mediums either. Watercolor or ink can complement your akrylika beautifully, creating vibrant contrasts and layers.
Remember to think about application techniques as well. Try layering your akrylika over dried mixed media components for a cohesive look that draws the viewer in.
Let your creativity flow freely! Mixed media is all about exploration—embrace it and see where it takes you in your artistic journey.
Troubleshooting Common Challenges in Working with Akrylika
Working with akrylika can be a rewarding experience, but like any medium, it has its challenges. Many artists face issues such as drying too quickly or difficulty in blending colors effectively. If you find your paint drying on the palette before you can use it, consider using a palette that retains moisture or adding a slow-drying medium to your paints.
Blending colors seamlessly is another common hurdle. If you’re struggling with this technique, try working in smaller sections and keep your brushes clean between color applications. A wet brush can also help to create smooth transitions when mixing shades.
Another concern might be achieving an even finish without streaks or brush marks. This often happens due to inadequate water usage or overworking the paint on the canvas. Apply thin layers instead of thick ones; this will not only reduce texture but also enhance vibrancy.
If you notice areas where the paint seems uneven after it’s dried, don’t fret—these imperfections can sometimes add character to your artwork! However, if you’d prefer them gone, simply layer additional coats of akrylika until you’ve achieved the desired look.
Remember that practice makes perfect. Every artist encounters difficulties along their journey with akrylika; embracing these challenges is part of developing your skills and style. Keep experimenting and don’t shy away from mistakes—they are valuable learning experiences that contribute significantly to mastering this versatile medium.